What is Cost allocation?
In large enterprises, Azure services are often managed centrally but used by various departments. The central team usually wants to redistribute the cost of these shared services to the departments using them. This is where cost allocation in Azure’s Cost Management comes in.
Cost allocation allows you to reassign the costs of shared services from one subscription, resource group, or tag to another within your organization. It’s a way to shift the financial responsibility of shared services to the departments or business units that consume them, enhancing cost accountability.
However, it’s important to note that cost allocation doesn’t support purchases like reservations and savings plans. Also, it doesn’t affect your billing invoice or change billing responsibilities. Its primary function is to facilitate internal chargebacks, showing costs as they are reassigned or distributed.
The allocated costs are visible in cost analysis, appearing as other items associated with the targeted subscriptions, resource groups, or tags specified in your cost allocation rule.
Reference: Microsoft learn
How to Get Started with Cost Allocation?
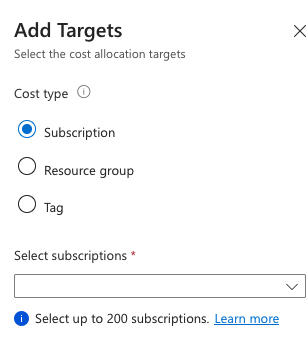
When it comes to cost allocation, the first step is deciding where your costs are coming from. You have three options to choose from:
- Subscription
- Resource Group
- Tag
Subscription/Resource Group
When you choose either of these options, all the costs associated with the selected subscription or resource group will be taken into account. This includes the costs of all resources and services within the subscription or resource group.
Tags
It’s important to note that if you choose Tags, some costs may still remain in the source subscription, like Defender for Cloud, even if you tag all the resources in a subscription. When tags are used, all the resources in your tenant with this tag will be selected.

Next, you’ll need to decide where these costs are going. Interestingly, you have the same three options as before. Allocating cost to a tag might seem a bit odd, and I haven’t tested this one yet, but it’s an option nonetheless.

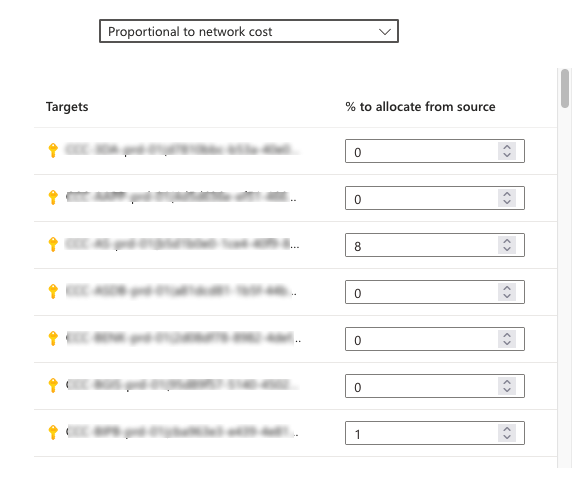
Once you’ve selected your source and destination (targets), it’s time to decide how you want to distribute these costs. You have a few options here. You can choose to distribute the costs evenly or proportionally to:
- Compute costs
- Network costs
- Storage costs
- Total costs

Currently, there’s no API available to distribute costs proportionally, so you’ll need to configure this through the portal. If you’re planning to use the API for cost allocation, you’ll have to perform the calculations yourself. However, if you’re looking to distribute costs evenly, I’ve got you covered. I’ve written a handy PowerShell function to help with this.
function New-TargetResources {
  [CmdletBinding()]
  param (
    [Parameter(Mandatory, ValueFromPipeline, ValueFromPipelineByPropertyName)]
    [string[]]$subscriptionId
  )

  begin {
    $TargetResources

    $percentage = 100 / $subscriptionId.count
  }

  process {
    foreach ($subscription in $subscriptionId) {
      $TargetResources += @{
        name         = 'SubscriptionId'
        policyType   = 'FixedProportion'
        resourceType = 'Dimension'
        values       = @(
          @{
            name       = $subscription
            percentage = $percentage
          }
        )
      }
    }
  }

  end {
    $TargetResources
  }
}
Practical Applications of Cost Allocation
Case Study: Shared AKS
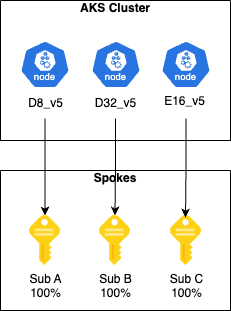
Imagine you’re using a shared AKS cluster. You have multiple teams, each working on different node pools with different SKUs. In this scenario, you’d want to allocate the costs of each specific node pool to the appropriate team.

Step 1: Tagging the Node Pools
The first step is to tag each node pool. This makes it clear which ’team’ it belongs to. In my case, I used a single tag that included an identifier of the workload and the environment, like this: wrkld-prod.
Step 2: Creating a Cost Allocation Rule
Next, you’ll want to create a Cost Allocation Rule. Use the tag for the spoke as the source and distribute 100% to the corresponding subscription. The beauty of this is that the tag can now be used for other services as well. Simply tag the specific resource and it will automatically rearrange the costs to the subscription.
Case Study: Azure Firewall
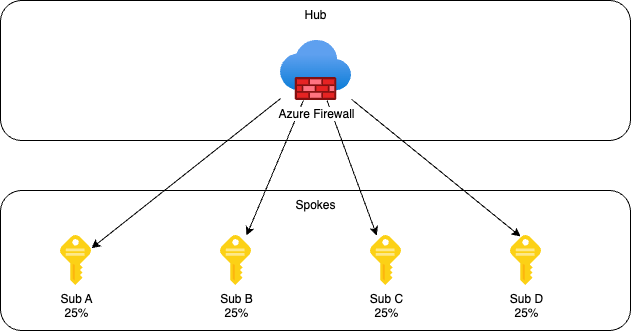
If you’re using a hub/spoke network model in Azure, chances are you have a central firewall in place where the traffic from your spoke is routed through. Cost allocation makes it possible to rearrange the cost from the subscription of the firewall to all the spokes.

Step 1: Retrieving All the Spokes
First, you’ll need to retrieve all the spokes that you want to allocate the firewall cost to. I used the PowerShell cmdlet Get-AzManagementGroupSubscription to get all the subscription IDs.
Step 2: Creating the Target Objects
You can use the PowerShell function above to distribute the costs evenly over all the subscriptions. If you want the costs to distribute proportionally to the network costs, you can do this step in the portal or retrieve information from the billing API.
Limitations to Keep in Mind
There are a few limitations to keep in mind:
- You cannot order the rules. The rules are executed in the order they were created.
- There is a function to allocate costs proportionally to network or compute cost, but this function is only available in the portal and not with the API.
- Target subscriptions are limited to 200. This means if you have a lot of spokes, you should consider only allocating to production subscriptions.
- You need to have EA administrator permissions, which you can’t give to an app registration. (I talked to microsoft and they are not implementing this any time soon)